Solving real* problems with compass and straightedge

In Geometry, the unit on constructions usually begins with demonstrations and practice copying a line segment, copying an angle, bisecting a segment, bisecting an angle. These are treated as building blocks, implicitly promising more detailed constructions later. And indeed, pretty soon the unit will have constructing a parallel line through a given point and constructing a perpendicular through a point. But learning “building blocks” too often slips into disconnected procedure practice. The justification usually becomes “you’ll need it later.” Not only is this thoroughly unsatisfying to the learner, but sometimes when we get to ‘later’ we treat that topic too as disconnected procedure.

What a student stuck in these types of classes must think! The future is promised to be full of interesting problems, but the present must be slogged through.

Let us bring the interesting problems into the now. What are the problems that are solved by the use of this skill?

Answer Distance Questions

A few years ago I and another teacher adapted a lesson from Dan Meyer that based these problems in the statement: “the compass measures distance.” Bay Area College Map Lesson Plan (PDF) A question asks, “How far is College of Marin from SFSU?” How do you do that? We could use a ruler, measure the map distance, measure the scale, and find the proportion. Or, you could eyeball the scale, or use your thumb and finger to approximate its copies. Notice both of these have a similarity to the actual compass and straightedge construction.

If you’re measuring the scale and the map distance, you are essentially copying the length of the scale segment onto a line between the two points. This is the copy a segment construction. Don’t worry about them reaching for a ruler at first– the questions are easier without one. But note also the discussion possibilities if we ask how that ruler compares to the compass. Given 1 inch, the rest of the markings are exactly what you’d make with your compass.

This lesson also encourages the concept that the circle drawn by the compass is the set of equidistant points from the compass’ center. Its the definition of a circle, of course, but this definition becomes actionable if we ask “are we closer to Cal or Mills right now?” We don’t have to jump to perpendicular bisector, instead we can do the slow way: where are all the points that are 10 miles from Cal AND 10 miles from Mills? Two circles get drawn. 5 miles from each? two more circles. 8 miles from each? two more circles. A pattern may start to emerge. Don’t be surprised if the students propose to draw the line between all those intersection points.

Constructions Course Plotting

This past month I’ve observed a few classrooms doing compass and straightedge introduction. After showing how, the teacher may say to practice it some number of times. But often students papers have only imitations of the compass marks and sketches that are obviously not exact copies. This may be confusing to teachers as the whole point is to “make a copy.” But if the student isn’t doing it, they aren’t stupid, its just the task is meaningless. Literally meaningless because they do not note what the important properties of the procedures are. The important properties of the procedures have a high word count to output ratio as well– “place the center of the compass at one end of a segment and open the other end to the other endpoint” yikes.
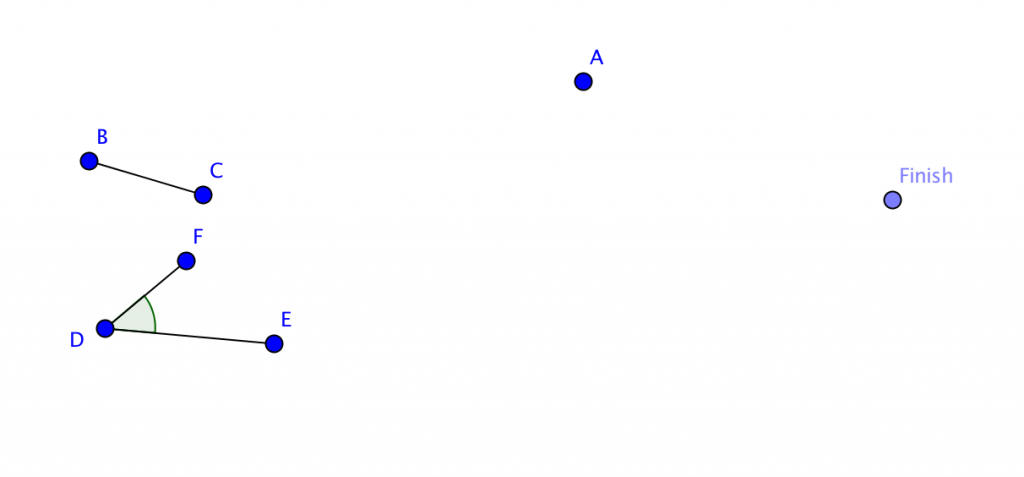
untitled-pictureWell lets try to pose a problem so that students need to copy segments and angles in order to complete it. What I’ve been brainstorming with is essentially “get from here to there.” Level one is shown to the left.

The rules:

  1. you may only travel in full lengths of BC (given)
  2. you may only turn in full angles of FDE (given)
  3. you may start in any direction

From these prompts, the students need to copy segments and angles. And they are allowed to “go” in a way that enables more creativity. Informal solutions (non constructions) are also acceptable because its completely reasonable to try something informally before formalizing it.

There are multiple solutions but the points are specifically chosen so that the start and end are not a multiple of BC. Student solutions can be gauged by how close they get to the finish, providing some motivation for “better” solutions but notice that the quality of their constructions is a separate measure.

I actually began this idea with the harder version in mind: put two random points on a large piece of paper, and draw blobs in the middle. (see image) Given a single segment and a single angle, can you use copies of them to make a path from start to finish without hitting the blobs?

There were a few things that jumped out at me as I thought about this. First, students will probably copy way more angles and segments this way than you’d be comfortable assigning in a drill. (and that’s good!) Other things that I wrote as I was thinking about the implementation and potential of the lesson

  1. The segment should be different than the width of the angle at the segment’s length away from the angle’s vertex. (What a mess of words — but essentially it means if the segment and angle require the compass to be almost the same opening then it can get confusing as to which measurement you have in your compass
  2. copying a segment becomes pretty straightforward (ha hah) but occasionally you’ll need to extend your target line — and experiencing that need is valuable to the students since it is difficult to describe in words.
  3. copying the angle requires changing the compass a lot — expect some struggle (but this is what you want them to overcome)
  4. the random placement of islands may prevent a solution from existing, but discovering that is powerful. Adaptations: maybe you’re allowed to go off the paper? or… see #8
  5. An easy level (like level 1 above) should probably be done first. Need to design it to require each of a segment and an angle.
  6. Medium level is like I’ve pictured here, or ones in which the teacher (before class) plots a solution route first, then places islands to design the level.
  7. Hard levels might be ones you let the students design for each other. These wont necessarily be hard, but just high variance of difficulty.
  8. An extension: if a level is particularly challenging, you could “allow” the students to bisect one segment or bisect one angle– and use that half-sized item once. Students faced with this choice will need to evaluate which choice is best– thus potentially practicing the bisect skill a few times.
  9. Elements of the parallel line construction can come out automatically, as students copy angles in the manner of corresponding angles on a transversal or alternate interior angles.
  10. Speaking of which– the angles on transversals and parallel lines come out of this activity naturally as well. Students may conjecture about congruent angles on parallels lending you some fodder for discussion now or when you bring up that unit later on.
  11. The underlying structure from a single segment and angle is a parallelogram grid. This can be useful to help you evaluate solutions but also can be discussed in the sense of it being an entry point into the algebra of constructible numbers. Not that you need to go into the concepts in detail, but you can lay some groundwork that

Further, I think there is ample opportunity for students to come up with creative solutions to a given level. Since the first direction is arbitrary, students are likely to have differing solutions anyway, and those can be celebrated. Students can look at each others work and notice similarities in the small issues confronted and solved (getting around an island) and also help each other with the skills without it being “the answer” to the problem at large. Students may be interested in improving their solution by doing it again with different choices. I can imagine a brilliant wall with dozens of student maps posted all over it!

If you try out this idea or something related to it, I’d love to hear about it! Here are some related resources I’ve already received:

Realness

Finally, the “realness”* of the problems here doesn’t rely in them being “realworld.” They are real in the sense that they can be answered by the use of the skill in question, perhaps in addition to accessing prior knowledge. This is in contrast to fake problems in which we say “practice the skill 3 times.” The main difference is that a real problem can be attacked without the skill– but the skill improves the solution. A fake problem asks directly for the skill so that it becomes the only possible solution.

What do you think? is that geogebra applet problem real or fake? Its very close, I say. A more fake version of this question would do entirely all the pre-processing for the student, telling them directly “copy EF”. Which is what I think many constructions lessons tend towards. I say the real-ness of this problem comes from the sense that I can provide a reasonable answer without using the compass and straightedge, while those tools would certainly improve my result. But– there certainly is a single right answer, and the construction is just about the only way to do it formally (if we assume pythagorean theorem to rely upon the construction). So– to make it more real we shake up the goal. The course plotting activity above is the shakeup: we have to get from start to finish using copied segments (and angles) but the students have agency in how those tools get used.

The goal here is compass and straightedge constructions. Forget “we’ll need this later” lets “need this now” !

Golden’s Rings and Polyhedral “Cups”

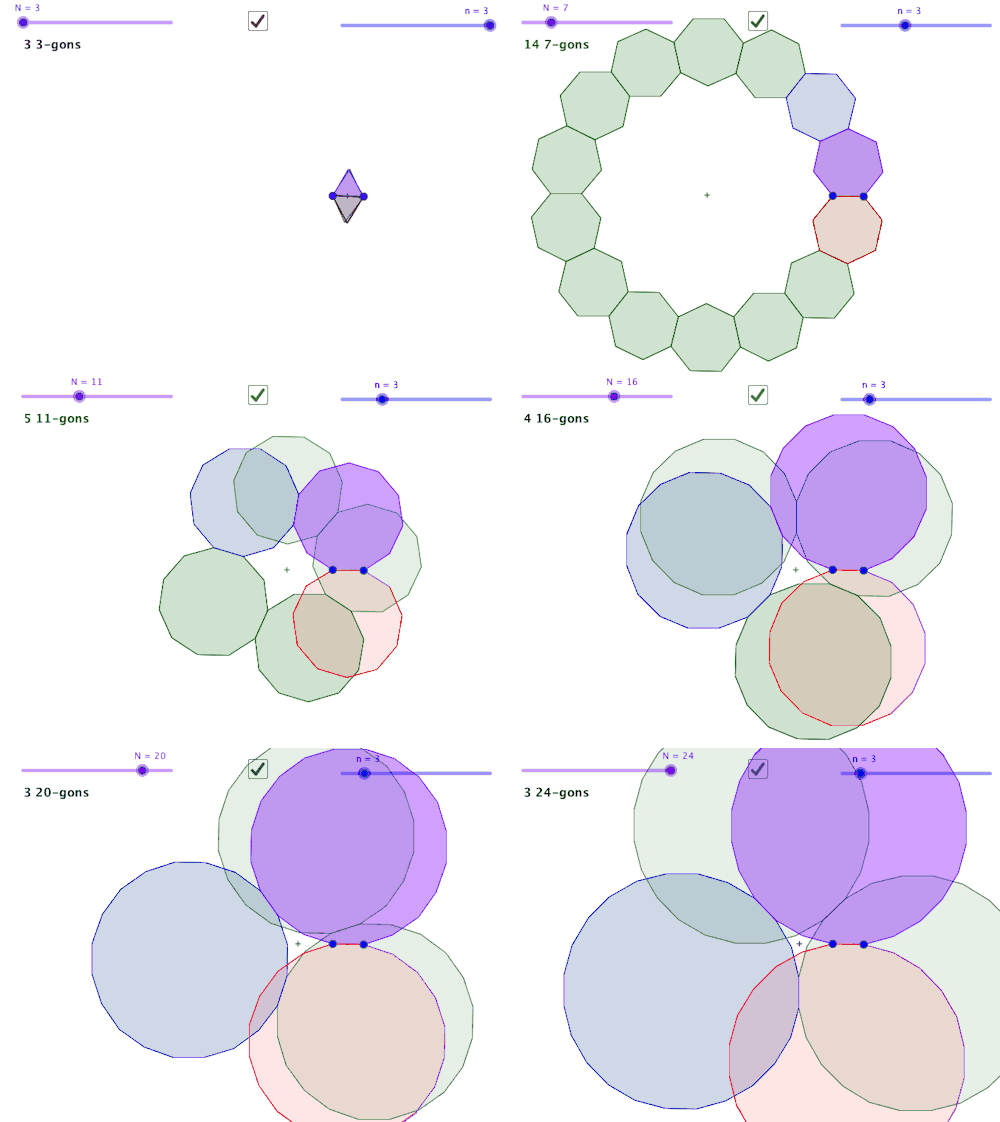
John Golden @mathhombre just posted some very interesting GeoGebra files exploring polygons repeatedly constructed on an edge of the previous. Here’s his post.

Golden’s Rings

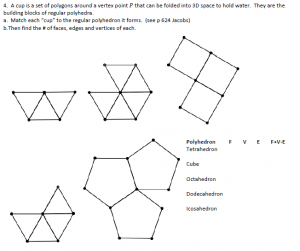
The sweet spots between # of sides of the polygon and the # of sides to offset for the new construction reminds me of the platonic solid and polyhedron lesson I do for Geometry.Polyhedral Nets, a repetition based approach

Instead of giving students the whole net, we would explore which regular polygons can be systematically repeated around a vertex and then “bend up into 3D space” in a manner that would “hold water.”

So, considering 2 triangles… no they just fold up on top of each other. But three triangles fold up into a nice tetrahedron “cup” (missing its cap)

Four triangles? Fold them and you see a square base missing– but fold another fourpolyhedron zoo... gotta catch em all and you get the tetrahedron. The idea being that we should do the least complicated instructions to find these shapes. If the “instructions” are short then perhaps they are more likely to occur in nature, especially if you are lacking storage space in your DNA/RNA.

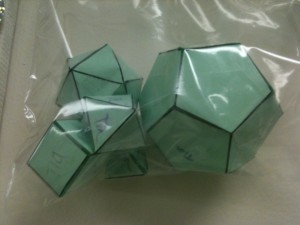
So which polygons actually form repeatable cases? The ones that can repeat around a vertex and leave a gap. Spoilers: three, four, five triangles, three squares, three pentagons. These correspond to the five platonic solids. There are some interesting differences however between the icosahedron’s repetition of its “cup” compared to the others. And consider the difference between the tetrahedron needing just one more triangle vs. the octahedron, dodecahedron, and cube needing full repetitions of their cups.

This can also be taken to extending/linking the concepts of tiling and polyhedrons. Two triangles and six triangles don’t fold up into a cup but they tile the plane instead. Are Regular Polyhedrons “closed tilings” of 3D space?  #continuummath ! 🙂

See one of my PDFs for the students here.

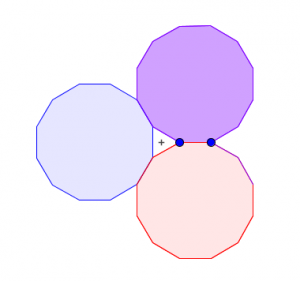
decagon triangleSo… back to John Golden’s geogebra file. I wonder if there are links to different types of polyhedra from the rings he’s created. Do repetitions of this dodecagon with a triangular gap form a polyhedron? No, but it does tile. So how about some of John’s other combinations?

Comments from other sites: Four animated gifs of the same awesome problem (dy/dan)

CFOS: Comments from other sites: I do a pretty good amount of writing online about math and math ed… just its not always here. In these posts I will link to the other site and copy over my comment with some context if needed. Mostly this is for me, so that I have a journal of what my thoughts were kept in one place.


Today’s CFOS is from Dan Meyer’s blog regarding the wonderful and somewhat famous task posed by Malcom Swan.  Dan writes,

Here is the original Malcolm Swan task, which I love:

Draw a shape on squared paper and plot a point to show its perimeter and area. Which points on the grid represent squares, rectangles, etc? Draw a shape that may be represented by the point (4, 12) or (12, 4). Find all the “impossible” points.

We could talk about adding a context here, but a change of that magnitude would prevent a precise conversation about pedagogy. It’d be like comparing tigers to penguins. We’d learn some high-level differences between quadripeds and bipeds, but comparing tigers to lions, jaguars, and cheetahs gets us down into the details. That’s where I’d like to be with this discussion.

So look at these four representations of the task. What features of the math do they reveal and conceal? What are their advantages and disadvantages?

paper

processing (code from Dan Anderson)


Geogebra by Scott Farrar

Desmos activity by Dan’s twitter followers


And my comments:

I’d love a combination of all of the above.

It appears that the Desmos activity had a drawback of no error checking. (Or, to call back your talk at CMC Asilomar, if this were a video game it would ask you to try again if your perim/area were impossible) In a customized Desmos applet, could you ask for width and height during the brainstorm rectangle phase, and then the second screen asks for perim and area? (couple more options here… you could still accept perim and area that do not match the given width, height: just flag them separately and then you can filter them out of the overlay or include them depending on where you want to take the lesson next)

It also appears that someone was investigating rectangles of a certain type, thus creating a rather straight line. Nice conversation starter there…

I think I am partial to the ability of my geogebra one to have the non-numerical entry point. On the other hand, they aren’t directly improving their skills in that arena either. A student is not hindered by calculation, but neither are they supported in it. But… I have liked giving a task to students where their interaction is manual and analog– meaning they are digging into the constraints and boundaries of a mathematical concept by physical motion and visual feedback. Does a student become immediately aware of and curious about this region that they cannot seem to get the dots into?

The processing one I like as a contrast to the hand-implemented geogebra. How would we systematically experiment around this idea? And when we devise a systematic approach, computers can be helpful in executing it. We can see the density of the dots is not uniform — what is the interaction between this perim v. area relationship and the way we have implemented our experiment? (I would guess the rectangle dimensions are chosen at random, thus creating a would-be-uniform display if not for the fundamental perimeter-area idea.)

The hand graph is limited in iteration, prone to calculation error, and slow. However, its requirements are all internal (save paper and pencil) rather than computer-based. Graphing by hand is perhaps the handle onto all of these other ideas. Is there research around how the concept of cartesian graphing changes if we grow up experiencing it in the computerized sense without the pencil and paper sense? I wonder!

For now I’d love to mix all of these in the classroom. When I spoke about this problem at Asilomar 2013, I used Malcom Swan’s initial prompts and provided grid paper for the attendees to grapple with the problem. Only afterwards did I move to the geogebra version (2013 version here, that has a slightly different scope)
And I would start the same way with students now. Here’s a rough timeline for a 1-2 day lesson:

1. paper rectangle in groups. Make a Perim v. Area graph on paper in your group that has your four rectangles. (this may correct some errors right away, like if kids put width and height instead of perim/area, their group may correct them)
2. Groups share on Desmos, add more rectangles. They are released from having to graph them on paper now. We are letting that go because Desmos will pick it up. Thus allowing students to step up their conceptual / abstracted approach.
3. class discussion, noticings, wonderings, address errors… blank region may become clearly curious here. Ok, now we’ve used the Desmos tool, but if we want to dig in with more rectangles, lets switch tools.
4. Geogebra sketch and/or programmed iteration. Groups come up with things to try and experiment with on the geogebra sketch, or devise a script that would generate perims and areas and plot them like Dan Anderson’s.
5. Return of the single case. Which points are on the edge? Can investigate with Geogebra sketch by hand. Or: can hand the class a mission on Desmos: “come up with rectangles that you think are on the edge”.
6. depending on the level of the class you can lead this towards some kind of proof or justification, entice students to make reasoned conjectures about what is going on.

Now we’ve taken the stepping stones from drawing a single rectangle to an aggregate set of many rectangles and their (p,a), to a set larger than what we could human-ly create. When we’re on step 4 there, we’re getting a handle on the abstraction of perimeters and areas of rectangles, thus allowing us to experiment with the abstraction just as easily as we worked with a single rectangle on paper at the beginning of class. But then we can go back and use each tool for what it helps with.

That, I believe, is the power of education technology: giving concrete handholds to abstract concepts. But tech is at its most powerful when working in concert with non-tech methods. And the possibilities of tech are so wide that no single tool was the magic bullet that enables this lesson– each one exposed a new vector to take.

Finally, remember Swan’s prompts (that did not aim to use technology) originally got at the existence of this concept by suggesting an impossible point and then suggesting that there are many others to find. His prompt defines these two regions (that we might call white and red for our purposes) with two examples: one red and one white. I wonder what the difference is about investigating the existence of white and red by imagining and reasoning on paper vs. bouncing up against their boundary on the geogebra applet.


Reddit Selection: Motivating geometry students to do proofs

In these posts I will share some of my reddit comments that I feel are worthy of saving.


You ask a good question, “How do you teach the act of proving without showing proofs?” In short, I don’t think you should not show them– but I don’t encourage memorization of them, and you should show more “proto-arguments” early in the year, becoming more and more formal as the year goes on.

I think my top level reply answers a little bit of my thoughts on the matter:https://www.reddit.com/r/matheducation/comments/3nhn28/motivating_geometry_students_to_do_proofs/cvon7ffbut I’ll say more here…

So first, I’m definitely NOT saying get rid of the theory. Proofs are the most important part of a typical geometry course. The course should be all about justification. But, I take issue with the development of proof in many textbooks– they often leap into it as either chapter 1 or 2 and say, “ok got it? good now the rest of the chapters will just ask for harder or longer proofs”

Consider this analogy. You’re taking a class in how to build a car. It would be silly for the class to have you first build a fully functional toy car, then a fully functional half size car, and finally a fully functional full size car. The size of the car is irrelevant to how difficult it is to create it. If we don’t know how to prove, then doing any proof is difficult.

So we should back up and think: what are the interior parts towards proof? i.e. what are the wheels, the engine, the gears?

I argue some of those internal parts are conjecture, precision of description, representing an idea in a format other than what it started as.

So consider something like the huge timewaster traditional vertical angles proof (see https://www.youtube.com/watch?t=201&v=wRBMmiNHQaE for how to turn a simple idea into 4:51 of boredom).

Instead of showing that proof or anything like it, ask students to draw two lines intersecting at any angle. Have them notice and wonder ( https://www.youtube.com/watch?v=a-Fth6sOaRA ) about what they see. You WILL have a kid claim that there are angles that are always equal– if you wait long enough. And then you can pounce, “hey, Bobby says that the angles he calls ‘across from each other’ are always equal, who agrees?” Use the vocab that the students came up with– or if its unclear, ask for clarification… ask other students if they can help clear up Bobby’s naming… reach a class consensus.


What you’re doing there is building the pre-requisite skills needed for proof. The students first need to be able to talk about their mathematical ideas with some level of precision. Many of them have never been asked to try (and then how are they going to prove anything?) As they get better at making mathematical statements and asking mathematical questions, they get better about linking answers together, and formalizing their informal reasons for belief in certain truths.

As you do these, you can also provide tools to students like examining how to draw conclusions from conditional statements (I wear my boots only if it is snowing. Its snowing… do I need my boots? (not necessarily) I only wear my boots if it is snowing. (oh, aren’t you cold then?) I wear my boots if it is snowing. (sounds reasonable)) and making a chain of logic using things like the law of syllogism or equivalent statements.

But these things should be developed over the course of the year. Students should always be justifying — but its is the formality and rigor that should increase. In the beginning they are making guesses, then conjectures, then argument ideas, then providing possible reasons, then linking reasons together, then referring to larger concepts and tie-ins… and then by the end of the year they can write a formal proof instead of a rough ‘because’.

I said this metaphor in the other post, but I’ll say it again here. Instead of doing ‘easy’/short proofs, then ‘harder’/longer proofs, building the structure of proof skills as if stacking blocks — think of proof skills going from unfocused to focused as if you are adjusting a lens throughout the year, bringing the structure of proof skills into sharper and sharper clarity.


https://www.reddit.com/r/matheducation/comments/3nhn28/motivating_geometry_students_to_do_proofs/cvphfrb?context=4

If Triangle Proofs are the aspirin, what is the headache?

Prove that two triangles are congruent.  Sometimes seen as the “first real proofs” of a Geometry course (but they should probably not be the first proofs done, and the types usually done aren’t much of proofs– but let that be for now).

How do you get students to feel the need to prove?  How do we give them a reasonable headache alleviated by the learning target’s aspirin?

The headache-aspirin idea can be illustrated like this:  add the first 100 integers.  1+2+3+…+100. The headache is that it seems like a lot of tedious work, but using Gauss’ arithmetic series folding idea, we fold the long sum onto itself and add pairs inward: 1+100, 2+99, … getting 50 sums each equal to 101, thus finding the sum of integers from 1 to 100 is 5050.  This legend is oft repeated as Gauss’ clever way to get around a teacher’s tedious punishment: notice how even in legend we appreciate the origin of a clever idea as a way to reduce tedium.

Back to triangle proofs.  We want students to see SSS, SAS, ASA, HL (SS-rightA) as useful tools to show that two triangles are congruent.  Dan Meyer made an astute comment: If proofs are the aspirin, the doubt is the headache. The congruency shortcuts are very abstract, but furthermore, a student may not have reason to believe or disbelieve whatever you are going to say on the subject of congruecy.  Two threads emerge here:

(1) why do we want to show triangles congruent?  How can we make a student doubt that triangles may be congruent?

Triangle congruence is our tool of two dimensional congruence.  So we need to have students care about congruence in general.  If your students are philosophical (and many are) then studying the idea of sameness/congruency has some grounding there. But all students are going to want something concrete as well.

(2) why do we use these little 3 part shortcuts?

The accepted shortcuts are an efficient result.  Nothing wrong with showing triangles are congruent by matching all six parts: SASASA — nothing wrong except efficiency. Arriving at the result of the triangle congruency shortcuts can be done by students themselves.

So here’s my scratchwork for a lesson idea: work from the opposite case, can we make a student doubt that different triangles exist? Building Different Triangles We infuse doubt by assigning students to find non-congruent triangles.  When they run up against their sandbox’s boundary– the conditions that cause some triangles to be automatically congruent– they can all of a sudden doubt that triangles can always be made differently.

Students in groups are given the task to build different triangles than their groupmates, given a set of matching triangle parts.  The given parts are either physical manipulatives or digital (advantages with each one)

0. Do we agree that if three sides and three angles are given to us, we can make only one triangle?  Why or why not?

0.5 Think ahead, what if we are given only 5 parts, can we make two different triangles?  What about given other numbers of parts, like 2?  Can we make different triangles then? How many different triangles?

1. Given A=30, AB=3, BC=2.  Make as many different triangles as possible. Related concept: SAS, Law of Cosines eventually.  Geogebra interactive.

ASS has a bad reputation

Geogebra applet exploring Angle Side Side

2. Given AB=3, BC=2.  Make as many different triangles as possible.  Related concept: triangle inequality.  Geogebra interactive.

3. Given AB=5, BC = 4, CA = 2.  Make as many different triangles as possible.  Related concept: converse of Pythagorean theorem.  Geogebra Interactive.

4. Given A=40, B=30, AB=5.  Make as many different triangles as possible.

5. Given A=40, B=30, BC=5.  Make as many different triangles as possible.

6. Given A=53, B=57, BC=5.35, AC=5.1.  Make as many different triangles as possible.

Be careful with the chosen values.  Sometimes (especially the first one) you want the students to arrive at different triangles.  Save the “we can’t!”/”they’re all the same” moment (SSS (3) / AASS (6) ) for later in the progression.

We also don’t need to restrict ourselves to tech-based manipulatives.  Straws and string work great for the SSS case.

What kind of conjectures would students make when exposed to this kind of task?  Many will apply the triangle angle sum, or have it solidified in their mind: meaning they can conjecture we at most need to be given two angles.  Hey, that’s a proposition we can prove!  That’s one students can prove, or at least justify.  And its not arbitrary or needless: its something that is a significant step towards reducing tedium of triangle differentiation.  If we know two angles, we know the third.

And how about conjecturing and proving statements like: to show two triangles are congruent, at least three parts must be known. (note, hypotenuse-leg gives three parts: two sides and the right angle) Or, at least one side must be known. These are within the grasp of proof by the students because they will have had the experience of seeing the counter examples and of building intuition about what forces the known congruency shortcuts to be what they are.

Thoughts?  extensions?

Student Inquiry into the Neighborhood of the Special Case

Lets look at Triangle Centers: a fun unit for many Geometry classes.  Its a topic with some good “real-world” applications, certainly, but we need not always justify our lessons with application.  And it may hold us back from important mathematical practices.  Pure math is underrated!  Lets compare some traditional textbook style application problems with an interactive style problem.  First, Holt Geometry:

angle bisector from holtangle bisector 2 from holtThose two problems are somewhat typical of some application motivators.  But consider a correct response from a student:
18.  Main street should be the angle bisector of the angle between Elm Street and Grove Street.
37.  Bisect the angle between the streets.  Draw the perpendicular bisector between the museum and the library.  The visitors center should be where those two lines cross.

How does this capture the imagination of a student?  If they know what an angle bisector is, they can supply an answer.  But if they do not know it (or haven’t made the connection about equidistance from sides) what kind of feedback can you give them that guides them to the answer without providing the answer?

But the book already provided the direct answer, earlier in this section: Theorem: a point is on the bisector of an angle if and only if it is equidistant from the sides.  #18 is almost explicitly asking for this theorem.  #37 asks a little more: it wants this theorem combined with the perpendicular bisector theorem, which led off this section– no prelude.  These questions are merely dressed up versions of those on Level 1 and Level 2 of Bloom’s Taxonomy.


With GeoGebra, we can provide loads and loads of information that (1) helps guide the student around the topic we want and (2) does not provide progress towards “the answer” in discrete unassailable steps.  We can be more helpful while being #lesshelpful.

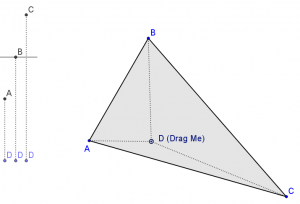
dist vertex 01Here is a picture of an applet I created to give some real-time information to students about point D and triangle ABC.  And here is the interactive applet itself, try it!

In this first static picture, what information is given to students?  Most students will be keen enough to see the comparison of the distances DA, DB, DC.  And all students will catch on after they start dragging point D.

What do we need to ask here to get students to think about perpendicular bisectors?  I say: “not much!”  My introduction to the applet is “Drag point D.  Find special locations.”  That’s not to say I’m not communicating with the students.  I’m communicating a great deal more!  I’m communicating through the boundaries and feedback programmed into the Geogebra manipulative.  Manipulatives are powerful in any setting, but computerized manipulatives enable modes of lessons not possible before.

I love doing triangle center lessons via oragami (or patty) paper.  I love doing triangle center lessons via compass and straightedge.  But the boundaries of those manipulatives do not guide the students.  If you make an incorrect fold or line, the paper doesn’t tell you so.  If you want to test distances with your compass or ruler, you must do them one at a time.  If you want to pursue a question other than equidistance (e.g.) then there may be other complicated procedures to follow.

Consider with GeoGebra:  by restricting the interaction to only dragging D, the students may no longer make unproductive moves.  Every move they make produces feedback via the distance “bar graph” and the color shading of D itself.  That feedback isn’t telling the student “incorrect”.  It is telling the student “here are the distances your input asked for.”  The student is then left to parse that information, and respond with more input.  This type of interaction between student and computer occurs within a fraction of a second.  And this type of interaction is repeated tens, hundreds, or thousands of times.  The student can then use the information to start digging into the prompt: what are the special locations for D?  What makes a location special anyway?  These are questions that can be asked and answered by students without teacher interruption.

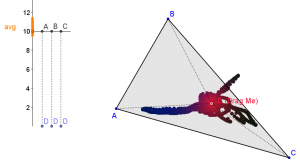
dist vertex 02But wait, there’s more!  Lets say a student has decided upon finding the place where DA=DB=DC.  Computerized Manipulatives now allow a task between this decision and the answer.  They must spend time actually getting point D to the correct spot.  In this Geogebra applet, they have the feedback from color and the bar graph to help them, but here is where the teacher can wait for a student to ask, “is there a better way?”  Boom!  We have arrived at the motivation for the circumcenter construction.  This motivation was driven by “pure” math ideas like equidistance… only we didn’t have to say it.  Proof in geometry should be introduced as a way to perfect our conjectures and hypotheses.  If the students haven’t made a conjecture, how are they going to care about its truth?

In this applet I decided to include an extension: another triangle center.  But this is not the usual 2nd center introduced.  Your students will find the blue point and notice what is special. Try it yourself!  Think about what is also done with this wordless separation of the two points in contrast to a lecture-based introduction: the students will have their own vocabulary to parse the difference that they have played with already, instead of the students having to parse vocabulary that describes a difference that they may not have been aware of.

In this applet I included two “answer” checkboxes.  Depending on where you want to take your class next, it they may steal some thunder from the lesson, but I figured I’d include them to help illustrate the point… and points. (hah)

GeoGebra and other computerized manipulatives enable us to think about Geometry and math in a way unfamiliar from static text or lecture.  Similar to The Lines Are Not Always Parallel, I’ve created a way for students to observe the neighborhood around the special case, and constructed silent helpful barriers and footholds that students can grab onto as they discover what is special for themselves.

Let me know what you think.


The Lines are Not Always Parallel! A geogebra approach to Alternate Interior Angles

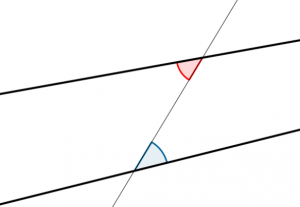
alt int angle image bigStudents are frequently confused by us harping on the importance of things that seem obvious: because we hardly ever show them the cases where the theorems are false.  One of the areas this comes up is Angles in Parallel Lines.  (The whole course of Geometry may feel like this, actually).  We teachers might feel like, “how do kids get confused here? its so easy and obvious!”  That’s right… so easy and obvious that we teachers have lost sight that we only show them these narrow cases.

We spend time proving that certain pairs of angles on parallel lines are congruent or supplementary.  Over and over and over… but always parallel lines!!  Maybe maybe we make an offhand comment about “if these lines weren’t parallel then the angles wouldn’t be congruent!”.  But those words hardly paint the picture for student.

But think of the infinite number of line that are not parallel!!

GeoGebra-logoSo, let us turn to Geogebra.  My philosophy in making this applet (and most of my applets) is to loosen some restrictions in our normal presentation so that more of the “sample space” can be explored.  Lets consider all lines cut by a transversal, not just parallel lines.  Then how many students will not only (1) appreciate parallel’s special nature and (2) make conjectures about congruent angles all by themselves?   This is much in the same vein as Michael Serra‘s Discovering Geometry book: set up a situation so that the students actions will lead them to make those conjectures.

The applet here lets students drag the line to all positions, and illustrates the red and blue angles, giving no measurements.  We want intuition here, not measurement.  Students might already have some idea “yeah they look close enough”.

The check box “Compare Angles” allows them to update their intuition when faced with a little more precision.  This kid who wasn’t able to articulate anything before might now realize in what realm we are trying to explore.

The check box “Compare Lines” allows them to make a connection to the properties of the pairs of lines.  Again, this is some non-verbal feedback and prodding to a student.  The student must assimilate this and then can provide the verbalization themselves.

Finally, I added in a little game at the end.  It will spit out a score based on how close to congruent the angles are.  (The formula is arbitrary, but spikes up very high when you’re close).  Let me know how this plays out with your students!  Do they get invested in beating each other’s high scores?  If so, notice that in trying to beat one-another, they must know that they want to make the lines “more parallel”.  Here we can embrace the difficulty of being precise when doing this with a trackpad or touchscreen.  Will your students say “hey if I could make them parallel, that should be an unbeatable perfect score!”  (I actually think Geogebra will spit out “infinity” score if it gets close enough– a happy consequence of the data structures they’re using)

Geogebra Doodads

Geogebra is a great tool for communicating mathematics.  In recent versions, developers have added the ability to export to HTML5 (as opposed to Java) making it even easier to share a ggb file.  In addition, an animated .gif file can be created from any ggb file with a slider in it.

In the past, I have dumped my various student activities and teacher presentations in one large directory.    Now, I want to start putting out my work in a little more organized fashion, by introducing them on the blog and tagging and labeling.  For now, I’ve decided to call them “Doodads”.  Perhaps a better vocab word is out there to represent the interactive, mathematical, and curiosity sparking nature of these creations.

Here is the first one:

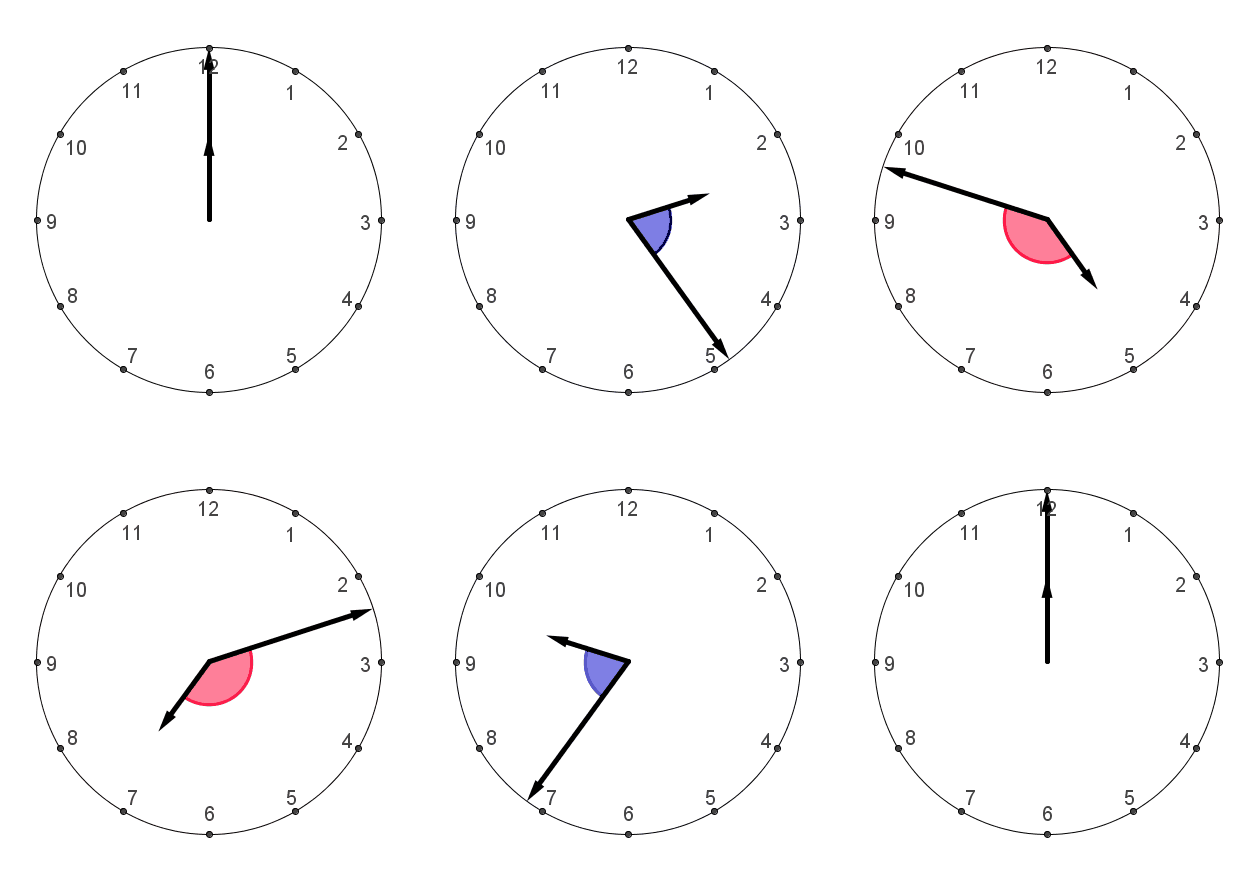
Time Angles (ggb doodad)

In the spirit of Dan Meyer’s WCYDWT, what is the first question that comes into your head?

The “answer” :

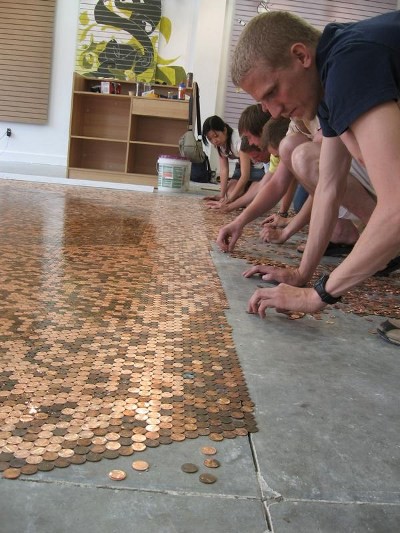
Copper Tiling… classic WCYDWT

Ran across this on reddit

The smile inducing “how much does it cost?” is a great place to start.

But how about “how much area is wasted?” to touch on the packing problem of circles. http://en.wikipedia.org/wiki/Circle_packing_in_a_square

And hey, might as well kick it up into 3D… http://www.youtube.com/watch?v=uDJ3sor2oQ0

Nice motivator, Holt.

Right Triangle Dog

The Holt Geometry book starts every section with some “real world” application of the topic.

Its a bad book.

EDIT: I’ll revise my comments from earlier this year.  Its an OK book.  In writing classes a common piece of advice is “show, don’t tell.”  The Holt Geometry book, along with many others, fail in this regard.  It does nothing for a student to read in chapter 1 that a^2+b^2=c^2.  The Pythagorean theorem is a result of a long logical flow of geometric arguments.  (and still, the inane “Who uses this?” motivators make me want to defenestrate somebody) -2010.05.04