
Solving real* problems with compass and straightedge
In Geometry, the unit on constructions usually begins with demonstrations and practice copying a line segment, copying an angle, bisecting a segment, bisecting an angle. These are treated as building blocks, implicitly promising more detailed constructions later. And indeed, pretty soon the unit will have constructing a parallel line through a given point and constructing a perpendicular through a point. But learning “building blocks” too often slips into disconnected procedure practice. The justification usually becomes “you’ll need it later.” Not only is this thoroughly unsatisfying to the learner, but sometimes when we get to ‘later’ we treat that topic too as disconnected procedure.
What a student stuck in these types of classes must think! The future is promised to be full of interesting problems, but the present must be slogged through.
Let us bring the interesting problems into the now. What are the problems that are solved by the use of this skill?
Answer Distance Questions
A few years ago I and another teacher adapted a lesson from Dan Meyer that based these problems in the statement: “the compass measures distance.” Bay Area College Map Lesson Plan (PDF) A question asks, “How far is College of Marin from SFSU?” How do you do that? We could use a ruler, measure the map distance, measure the scale, and find the proportion. Or, you could eyeball the scale, or use your thumb and finger to approximate its copies. Notice both of these have a similarity to the actual compass and straightedge construction.
If you’re measuring the scale and the map distance, you are essentially copying the length of the scale segment onto a line between the two points. This is the copy a segment construction. Don’t worry about them reaching for a ruler at first– the questions are easier without one. But note also the discussion possibilities if we ask how that ruler compares to the compass. Given 1 inch, the rest of the markings are exactly what you’d make with your compass.
This lesson also encourages the concept that the circle drawn by the compass is the set of equidistant points from the compass’ center. Its the definition of a circle, of course, but this definition becomes actionable if we ask “are we closer to Cal or Mills right now?” We don’t have to jump to perpendicular bisector, instead we can do the slow way: where are all the points that are 10 miles from Cal AND 10 miles from Mills? Two circles get drawn. 5 miles from each? two more circles. 8 miles from each? two more circles. A pattern may start to emerge. Don’t be surprised if the students propose to draw the line between all those intersection points.
Constructions Course Plotting
This past month I’ve observed a few classrooms doing compass and straightedge introduction. After showing how, the teacher may say to practice it some number of times. But often students papers have only imitations of the compass marks and sketches that are obviously not exact copies. This may be confusing to teachers as the whole point is to “make a copy.” But if the student isn’t doing it, they aren’t stupid, its just the task is meaningless. Literally meaningless because they do not note what the important properties of the procedures are. The important properties of the procedures have a high word count to output ratio as well– “place the center of the compass at one end of a segment and open the other end to the other endpoint” yikes.
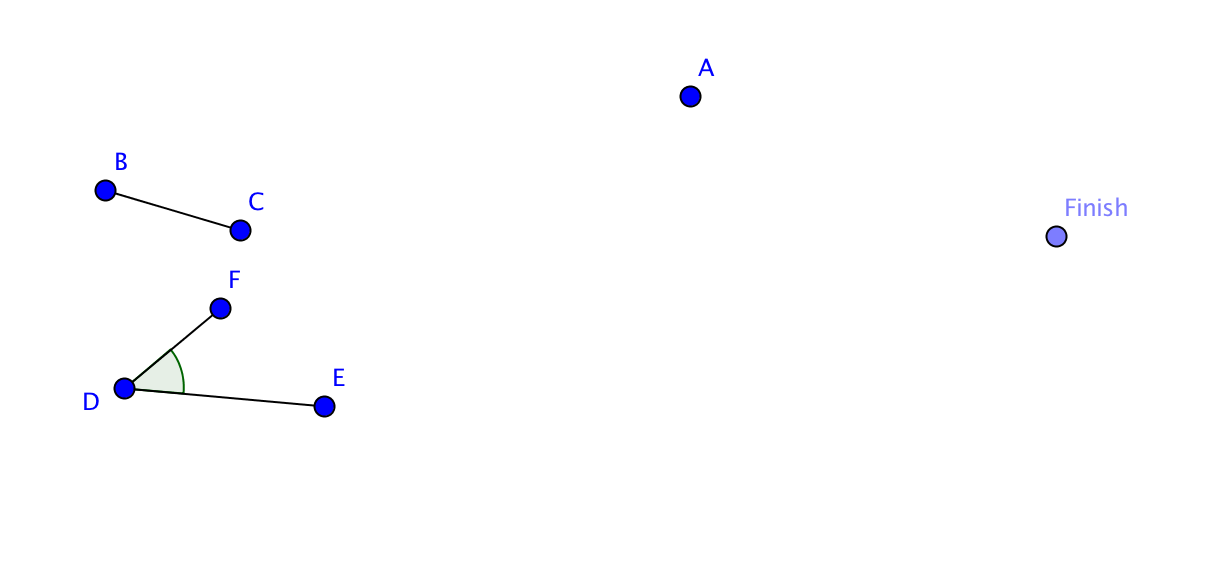 Well lets try to pose a problem so that students need to copy segments and angles in order to complete it. What I’ve been brainstorming with is essentially “get from here to there.” Level one is shown to the left.
The rules:
- you may only travel in full lengths of BC (given)
- you may only turn in full angles of FDE (given)
- you may start in any direction
From these prompts, the students need to copy segments and angles. And they are allowed to “go” in a way that enables more creativity. Informal solutions (non constructions) are also acceptable because its completely reasonable to try something informally before formalizing it.
There are multiple solutions but the points are specifically chosen so that the start and end are not a multiple of BC. Student solutions can be gauged by how close they get to the finish, providing some motivation for “better” solutions but notice that the quality of their constructions is a separate measure.
I actually began this idea with the harder version in mind: put two random points on a large piece of paper, and draw blobs in the middle. (see image) Given a single segment and a single angle, can you use copies of them to make a path from start to finish without hitting the blobs?
Creative constructions lesson: allow only copies of one segment and one angle. #MTBoS #geomchat get from A to B. pic.twitter.com/9AH8cLgclB
— Scott Farrar (@farrarscott) September 9, 2016
There were a few things that jumped out at me as I thought about this. First, students will probably copy way more angles and segments this way than you’d be comfortable assigning in a drill. (and that’s good!) Other things that I wrote as I was thinking about the implementation and potential of the lesson
- The segment should be different than the width of the angle at the segment’s length away from the angle’s vertex. (What a mess of words — but essentially it means if the segment and angle require the compass to be almost the same opening then it can get confusing as to which measurement you have in your compass
- copying a segment becomes pretty straightforward (ha hah) but occasionally you’ll need to extend your target line — and experiencing that need is valuable to the students since it is difficult to describe in words.
- copying the angle requires changing the compass a lot — expect some struggle (but this is what you want them to overcome)
- the random placement of islands may prevent a solution from existing, but discovering that is powerful. Adaptations: maybe you’re allowed to go off the paper? or… see #8
- An easy level (like level 1 above) should probably be done first. Need to design it to require each of a segment and an angle.
- Medium level is like I’ve pictured here, or ones in which the teacher (before class) plots a solution route first, then places islands to design the level.
- Hard levels might be ones you let the students design for each other. These wont necessarily be hard, but just high variance of difficulty.
- An extension: if a level is particularly challenging, you could “allow” the students to bisect one segment or bisect one angle– and use that half-sized item once. Students faced with this choice will need to evaluate which choice is best– thus potentially practicing the bisect skill a few times.
- Elements of the parallel line construction can come out automatically, as students copy angles in the manner of corresponding angles on a transversal or alternate interior angles.
- Speaking of which– the angles on transversals and parallel lines come out of this activity naturally as well. Students may conjecture about congruent angles on parallels lending you some fodder for discussion now or when you bring up that unit later on.
- The underlying structure from a single segment and angle is a parallelogram grid. This can be useful to help you evaluate solutions but also can be discussed in the sense of it being an entry point into the algebra of constructible numbers. Not that you need to go into the concepts in detail, but you can lay some groundwork that
Further, I think there is ample opportunity for students to come up with creative solutions to a given level. Since the first direction is arbitrary, students are likely to have differing solutions anyway, and those can be celebrated. Students can look at each others work and notice similarities in the small issues confronted and solved (getting around an island) and also help each other with the skills without it being “the answer” to the problem at large. Students may be interested in improving their solution by doing it again with different choices. I can imagine a brilliant wall with dozens of student maps posted all over it!
If you try out this idea or something related to it, I’d love to hear about it! Here are some related resources I’ve already received:
@farrarscott Very cool! You might also like this https://t.co/6a1K9iW2hl
— Aran W. Glancy (@aranglancy) September 9, 2016
@zimmerdiamonds @farrarscott Possibly useful:https://t.co/2yWwKnvGFA
A puzzle approach. Was super-popular in my geometry classes.— Henri Picciotto (@hpicciotto) September 12, 2016
Realness
Finally, the “realness”* of the problems here doesn’t rely in them being “realworld.” They are real in the sense that they can be answered by the use of the skill in question, perhaps in addition to accessing prior knowledge. This is in contrast to fake problems in which we say “practice the skill 3 times.” The main difference is that a real problem can be attacked without the skill– but the skill improves the solution. A fake problem asks directly for the skill so that it becomes the only possible solution.
What do you think? is that geogebra applet problem real or fake? Its very close, I say. A more fake version of this question would do entirely all the pre-processing for the student, telling them directly “copy EF”. Which is what I think many constructions lessons tend towards. I say the real-ness of this problem comes from the sense that I can provide a reasonable answer without using the compass and straightedge, while those tools would certainly improve my result. But– there certainly is a single right answer, and the construction is just about the only way to do it formally (if we assume pythagorean theorem to rely upon the construction). So– to make it more real we shake up the goal. The course plotting activity above is the shakeup: we have to get from start to finish using copied segments (and angles) but the students have agency in how those tools get used.
The goal here is compass and straightedge constructions. Forget “we’ll need this later” lets “need this now” !